

Takeoff and Landing
Understanding runway markings and distances is crucial for safe takeoffs and landings. Here, we cover six essential visual aids every pilot should know. Learn to identify threshold markings, runway centerline markings, touchdown zone markings, displaced thresholds, runway distance remaining signs, and runway end identifier lights (REIL). Mastering these markings and distances improves safety and efficiency during flight operations. This knowledge is essential for both aspiring and experienced pilots looking to enhance their skills.
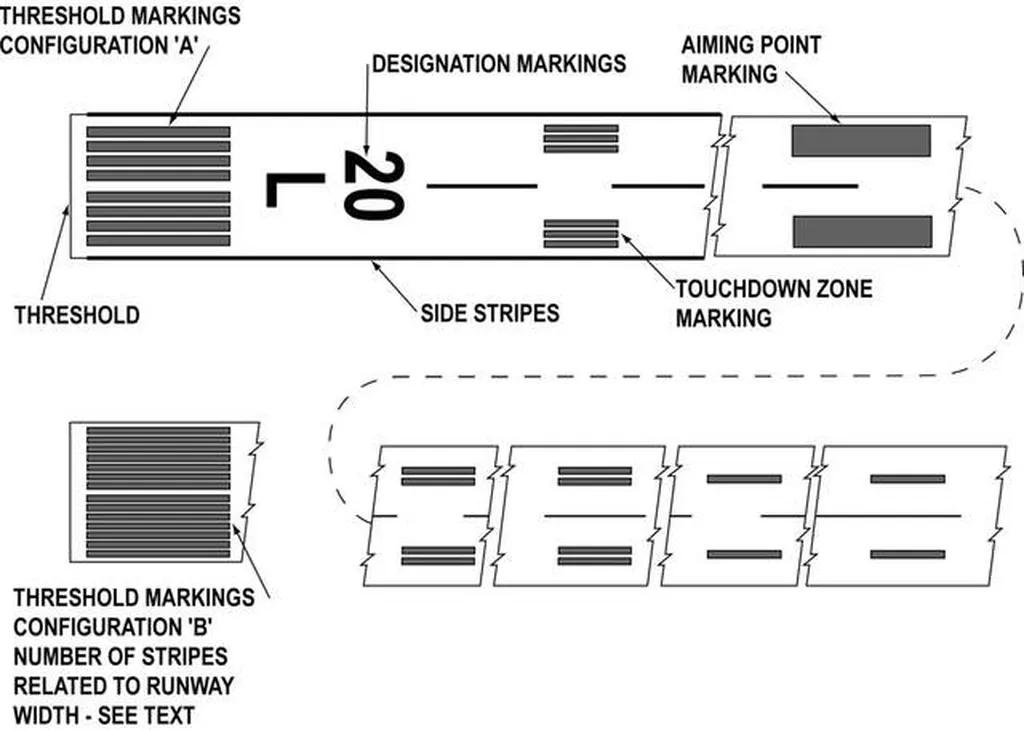
1. Threshold Markings
Threshold markings are a critical component of runway markings and distances, serving as the visual gateway to a safe landing. They delineate the beginning of the runway suitable for landing, providing pilots with a clear visual reference for touchdown. These markings are essential for all types of landings, from visual approaches under clear skies to instrument approaches in challenging weather conditions. Understanding their purpose and features is fundamental for every pilot, contributing significantly to safe flight operations.
Threshold markings consist of a series of white stripes positioned perpendicular to the runway centerline, effectively marking the beginning of the landing zone. The number of stripes varies depending on the runway width, ensuring adequate visual guidance for pilots on runways of different sizes. For runways between 60 and 75 feet wide, four stripes are used. Six stripes designate the threshold for 100-foot wide runways, eight for 150-foot runways, and twelve for those spanning 200 feet. Each individual stripe is 150 feet long and 12 feet wide, spaced 6 feet apart edge to edge, creating a distinct visual pattern. This standardization allows pilots to quickly assess the runway width and adjust their approach accordingly.
The benefits of clearly defined threshold markings are numerous. They provide a vital visual cue for pilots during the final stages of approach, aiding in precise touchdown point control. This is particularly crucial during instrument approaches when visibility is limited, allowing pilots to accurately transition from instrument guidance to visual references for landing. Furthermore, the standardized nature of these markings ensures consistency across airports worldwide, facilitating safe operations for pilots flying in different regions. The clearly defined threshold also helps pilots judge the available landing distance and plan their touchdown point accordingly.
While the benefits are undeniable, some potential challenges exist concerning threshold markings. They require regular maintenance and repainting to maintain their visibility, which can be a significant undertaking for airport operators. Adverse weather conditions, such as snow accumulation, can obscure the markings, requiring diligent clearing efforts. Rubber deposits from aircraft tires can also build up on the stripes, reducing their contrast and effectiveness. Furthermore, pilots need to be aware of displaced threshold markings, which indicate a portion of the runway is unusable for landing. These are marked with yellow chevrons and require careful attention to avoid landing short of the designated landing area. Understanding the difference between standard and displaced threshold markings is paramount for safe landing procedures.
Threshold markings can be found on runways at all major international airports, including JFK, Heathrow, and Dubai International. Military airfields worldwide also utilize these standardized markings, as do general aviation airports meeting FAA Part 77 requirements. This widespread implementation highlights the crucial role threshold markings play in ensuring safe and efficient flight operations globally.
For pilots, it’s crucial to understand the significance of these markings. Always verify the threshold position before landing, especially when unfamiliar with the airport. Use threshold markings in conjunction with approach lighting systems for enhanced situational awareness during low-visibility conditions. Be aware that runway thresholds can be temporarily or permanently displaced due to construction or other factors. Proper pre-flight planning and runway familiarization are key to recognizing and responding appropriately to these situations. Diligently observing and interpreting threshold markings helps pilots contribute significantly to the safety and precision of every landing.
Learn about aeronautical decision-making.
2. Runway Centerline Markings
Runway centerline markings are a fundamental component of airport infrastructure, providing crucial guidance to pilots during takeoff, landing, and taxi operations. These markings consist of a continuous line of white paint running down the center of the runway, offering a clear visual reference for pilots to maintain alignment and prevent runway excursions. This consistent visual aid significantly enhances safety, especially during low visibility conditions and complex runway configurations. Their importance in maintaining safe operations makes centerline markings a critical element in runway markings and distances.
The distinctive pattern of the centerline markings, alternating between stripes and gaps, helps pilots judge distances and maintain a consistent track along the runway. These markings are not simply a continuous line; they are strategically designed with specific dimensions. Each stripe is 120 feet long, separated by an 80-foot gap. On runways 75 feet wide or greater, the stripes are 12 inches wide. For narrower runways (less than 75 feet), the stripes are 6 inches wide. This standardized design ensures uniformity across different airports, allowing pilots to easily interpret the markings regardless of their location. The centerline markings extend from threshold to threshold, covering the entire usable length of the runway.
The presence of centerline markings provides several critical benefits. They are essential for maintaining runway alignment in all visibility conditions, from clear skies to dense fog. During instrument approaches, particularly Category II and III approaches which require very low visibility operations, the centerline markings become the primary visual reference for pilots. They also play a vital role in preventing runway excursions, which are a significant safety concern in aviation. By providing a clear visual guide, the centerline markings help pilots maintain proper runway alignment, especially during challenging conditions like crosswinds or reduced visibility.
While the benefits are undeniable, maintaining runway centerline markings comes with certain challenges. The constant wear and tear from aircraft tires require frequent repainting and maintenance, resulting in high maintenance costs for airports. Rubber deposits from aircraft tires can also accumulate on the markings, reducing their visibility, especially in wet conditions. Specialized equipment is needed for the application and maintenance of these markings, adding to the overall cost.
Despite these challenges, the critical role of centerline markings in ensuring safe runway operations makes them an indispensable part of any airport. They are mandatory on all precision instrument runways and are a key feature in complex runway configurations. For instance, Chicago O’Hare International Airport, known for its multiple parallel runways, relies heavily on centerline markings for safe and efficient traffic flow. Similarly, Los Angeles International Airport, with its crossed runway configuration, utilizes centerline markings to guide pilots through its intricate layout.
For aspiring pilots, understanding and utilizing runway centerline markings is paramount. Here are a few practical tips:
- Primary Lateral Reference: Use the centerline markings as your primary lateral reference during takeoff, landing, and taxi operations. Develop a habit of consistently scanning the centerline to ensure you maintain proper alignment.
- Crosswind Conditions: Pay extra attention to centerline tracking during crosswind conditions. The visual reference provided by the markings becomes even more crucial in these situations to prevent drifting off course.
- Runway Intersections: Be aware that the centerline may curve at runway intersections. Anticipate these changes in alignment and adjust your steering accordingly.
These markings are not just lines on the pavement; they are a vital part of the runway markings and distances system, providing essential guidance for pilots in all phases of flight.
3. Touchdown Zone Markings
Precision and consistency are paramount in aviation, especially during landing. Touchdown zone markings play a crucial role in achieving these goals by providing pilots with visual cues for distance and alignment on the runway. These markings, found exclusively on precision instrument runways, are strategically placed to assist pilots in judging their touchdown point and maintaining a stabilized approach, especially valuable during low visibility conditions. Understanding their purpose and effective utilization can significantly enhance landing safety and performance. They offer a valuable visual aid for judging the aircraft’s position relative to the desired touchdown point. This is especially useful in challenging conditions like low visibility or strong crosswinds.
These markings appear as pairs of rectangular white blocks, symmetrically positioned on either side of the runway centerline. Each group of blocks denotes a specific distance from the landing threshold: one pair signifies 500 feet, two pairs indicate 1000 feet, and three pairs represent 1500 feet. Each individual block measures 150 feet long and 6 feet wide, positioned 10 feet from the runway centerline. This standardized placement ensures consistent visual references for pilots across different airports equipped with these markings.
The strategic placement of touchdown zone markings provides several key advantages. First, they offer precise distance information during the approach, allowing pilots to accurately judge their aircraft’s position relative to the threshold and desired touchdown point. This is particularly helpful in low visibility situations where external visual references may be limited. Second, they aid in maintaining consistent landing performance by providing a visual target for the touchdown. Aiming for the touchdown zone within the first 1000 feet, indicated by the two pairs of markings, is generally considered optimal for most aircraft. This practice promotes stable approaches and minimizes the landing roll, conserving runway space and reducing wear and tear on the aircraft’s braking system.
For example, major hub airports like Atlanta Hartsfield-Jackson International Airport, known for its high traffic volume and complex operations, utilize touchdown zone markings on its precision instrument runways. Similarly, military installations with precision approach capabilities also employ these markings to ensure safe and precise landings for a variety of aircraft types. These real-world examples highlight the importance of touchdown zone markings in maintaining consistent and safe landing procedures across diverse aviation environments.
While touchdown zone markings offer significant benefits, they also have some limitations. The most notable is their exclusive presence on precision instrument runways, meaning they aren’t available to pilots operating on smaller airfields or those without instrument landing systems. Furthermore, inexperienced pilots might confuse these markings with other runway markings, especially during their initial training phase. Thorough familiarization with all runway markings is crucial to avoid misinterpretation. Finally, the installation and maintenance of these markings can be expensive, potentially limiting their widespread adoption at smaller airports with budget constraints. Understanding these limitations allows pilots to appropriately utilize and interpret the available visual aids during landing.
Touchdown zone markings, in particular, offer valuable visual cues during the approach and landing phases of flight. By understanding the meaning and placement of these markings, pilots can improve their landing accuracy, maintain consistent performance, and enhance safety, particularly in challenging weather conditions. Practical tips include using the markings to judge your approach angle, aiming for touchdown within the first 1000 feet marked zone, and counting the marking groups to estimate the distance from the threshold. These strategies contribute to safer, more predictable, and efficient landings.
4. Displaced Threshold
A displaced threshold is a critical runway marking that signifies a portion of the runway suitable for takeoff but not for landing. It’s a vital aspect of runway markings and distances, impacting both takeoff and landing procedures. This modified threshold exists for various safety and operational reasons, modifying the available landing distance while preserving the full runway length for departing aircraft. It’s a key element in safe and efficient runway operations.
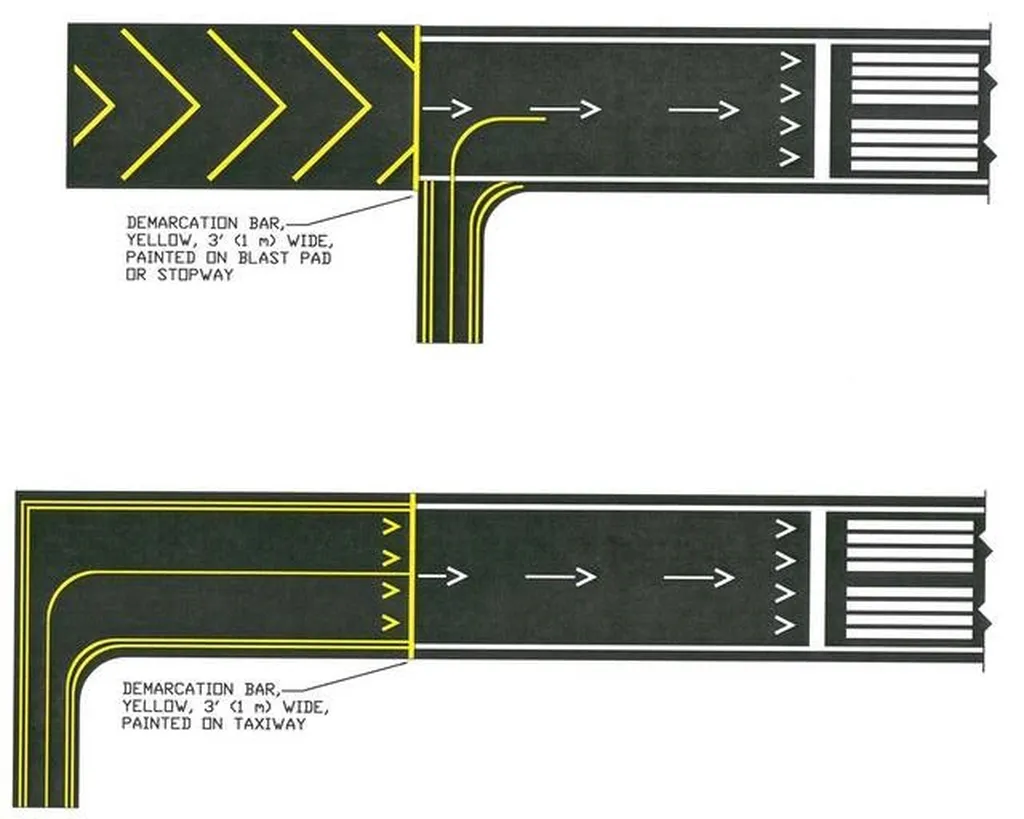
A displaced threshold is visually identified by a series of white arrows leading to the actual landing threshold, which is marked with the standard runway threshold markings. The area preceding the displaced threshold is typically marked with white chevrons or arrows, clearly indicating the unusable portion of the runway for landing. Think of it like a buffer zone. While aircraft can taxi and begin their takeoff roll in this area, touching down here during landing is strictly prohibited. This is because the displaced portion might not offer the required safety margins for landing, potentially due to obstacles in the approach path or other safety considerations.
Displaced thresholds can be either temporary or permanent. Temporary displacements often occur during construction or maintenance projects, allowing the runway to remain partially operational while work is underway. Permanent displacements, on the other hand, are implemented due to fixed obstacles near the runway, such as buildings, terrain features, or bodies of water. For instance, LaGuardia Airport’s Runway 4-22 has a displaced threshold due to the proximity of Flushing Bay. Similarly, Innsbruck Airport in Austria utilizes displaced thresholds because of the surrounding mountainous terrain. These examples highlight the versatility of displaced thresholds in maintaining operational capability while ensuring safety.
The advantages of a displaced threshold are numerous. Primarily, they permit the continued use of a runway even when obstacles obstruct the initial segment of the approach path. This is particularly beneficial during construction projects, minimizing disruptions to airport operations. By preserving the full runway length for departures, aircraft can achieve the necessary takeoff speeds safely. This flexibility is crucial for maintaining efficient traffic flow, especially at busy airports.
However, displaced thresholds also present some challenges. The most significant drawback is the reduction in available landing distance. Pilots must carefully calculate their landing performance, factoring in the shortened landing area. This is especially important for larger aircraft or those operating at higher weights. Confusion can arise if the displaced threshold isn’t clearly marked or if pilots aren’t adequately briefed on its presence. Therefore, proper signage, lighting, and communication are essential. Additionally, the presence of a displaced threshold might necessitate adjustments to approach procedures, requiring pilots to familiarize themselves with these changes.
For pilots, it’s essential to consult Notices to Airmen (NOTAMs) regularly for information about temporary displaced thresholds. Accurate calculation of the available landing distance is paramount for safe operations. When authorized, pilots should utilize the displaced area for taxi operations, streamlining ground movements and improving runway efficiency. Understanding why pilots sometimes execute a go-around can also be helpful in appreciating the safety margins required for landing and how a displaced threshold might factor into such decisions.
5. Runway Distance Remaining Signs
Runway distance remaining signs are a critical element of runway markings and distances, providing pilots with essential information for safe landing and takeoff operations. These signs, easily identifiable by their bright yellow background and bold black numerals, display the remaining runway distance in thousands of feet. Their strategic placement along the runway edges allows pilots to quickly assess available landing distance during rollout and make timely decisions during rejected takeoffs. This real-time distance information plays a vital role in preventing runway excursions, enhancing pilot situational awareness, and contributing to overall flight safety. This is why they deserve a prominent place on any list concerning runway markings and distances.
These signs are not just arbitrary markers; they are precisely engineered and strategically placed to offer maximum benefit. Positioned on both sides of the runway at 1000-foot intervals, they offer continuous distance updates to pilots as they traverse the runway. The numbers themselves are large and clear, designed for quick recognition even under high-stress situations. Critically, they are retroreflective, ensuring visibility even during nighttime operations or under poor weather conditions. This consistent and readily available information flow is invaluable for pilots, particularly during critical phases of flight.
One of the primary benefits of runway distance remaining signs is their contribution to preventing runway excursions. A runway excursion occurs when an aircraft departs the runway surface before completing its landing roll or during a rejected takeoff. These incidents can have serious consequences, ranging from aircraft damage to injury or even loss of life. By providing pilots with a continuous update of available runway distance, these signs enable them to accurately judge their deceleration rate and ensure they have sufficient runway to bring the aircraft to a safe stop. In the event of a rejected takeoff, the signs become even more crucial, providing pilots with instant feedback on the remaining distance available to stop the aircraft within the runway confines.
Furthermore, these signs are essential for informed decision-making during go-arounds. A go-around is a procedure initiated when a landing approach is deemed unsafe or unstable, requiring the pilot to abort the landing and climb back up for another approach. Runway distance remaining signs allow pilots to quickly assess the remaining runway length and determine if they have sufficient distance to safely continue the landing or if a go-around is necessary. This immediate awareness is vital for avoiding potentially hazardous situations.
While runway distance remaining signs offer significant safety advantages, they also have some limitations. Not all airports are equipped with these signs, particularly smaller general aviation airfields. Even at airports where they are installed, visibility can be compromised by adverse weather conditions such as heavy rain, fog, or snow. Additionally, parts of the aircraft, such as the wing or landing gear, can momentarily obscure the signs from the pilot’s view. Regular maintenance and periodic replacement are also necessary to ensure their continued effectiveness. Finally, there’s a potential, albeit small, for confusion with similar signage used on taxiways.
Despite these limitations, the benefits of runway distance remaining signs far outweigh their drawbacks. Their contribution to runway safety is undeniable, making them an indispensable tool for pilots.
Runway distance remaining signs can be integrated with other cockpit tools for optimal performance calculations. For instance, understanding how to use a flight computer allows you to cross-reference the information provided by the distance remaining signs with your aircraft’s performance charts, ensuring accurate decision-making.
Here are some actionable tips for utilizing runway distance remaining signs effectively:
- Verify Landing Performance: Use the signs to confirm that your aircraft’s deceleration rate is consistent with the available runway distance. This is especially important in challenging conditions such as a wet or icy runway.
- Make Go-Around Decisions Early: Don’t wait until the last moment to decide on a go-around. Use the distance remaining signs to proactively assess the situation and initiate the go-around procedure before reaching a critical point.
- Cross-Reference with Aircraft Performance Charts: Combine the information from the distance remaining signs with your aircraft’s performance data to make informed decisions about landing and takeoff performance.

Runway distance remaining signs are a vital component of runway markings and distances, providing pilots with crucial information for safe and efficient operations. By understanding how to use these signs effectively, pilots can enhance their situational awareness, prevent runway excursions, and make sound decisions during critical phases of flight. Examples of successful implementation can be seen at all major US commercial airports, international airports meeting ICAO standards, and military airfields with high-performance aircraft operations.
6. Runway End Identifier Lights (REIL)
Runway End Identifier Lights (REIL) play a crucial role in enhancing runway identification, especially during periods of reduced visibility. As a key component of runway markings and distances, REIL provides pilots with a clear visual cue indicating the approach end of the runway. This system, comprising a pair of synchronized flashing white lights, is strategically positioned on either side of the runway threshold, offering a rapid and unmistakable signal to pilots. Understanding the function, benefits, and limitations of REIL is essential for all pilots, particularly those operating in challenging visual conditions.
REIL operates on a simple yet effective principle. The two lights flash in synchronization at a rate of 60-120 flashes per minute. This synchronized flashing pattern makes them easily distinguishable from other airport lighting systems. The omnidirectional light distribution ensures 360-degree visibility, allowing pilots approaching from any direction to clearly identify the runway threshold. This feature is particularly beneficial in situations where other visual aids might be obscured by weather or terrain.
The implementation of REIL provides several significant advantages. In conditions of poor visibility, such as fog, haze, or light rain, REIL can greatly enhance runway identification, significantly improving safety margins. Compared to more complex approach lighting systems (ALS), REIL is relatively inexpensive to install and maintain, making it a cost-effective solution for smaller airports and general aviation facilities. The simplicity of the system also contributes to its ease of maintenance.
Several successful implementations highlight the value of REIL. Smaller regional airports without the budget for full approach lighting systems often rely on REIL as a primary means of runway identification. General aviation airports, frequently operating under visual flight rules (VFR), also benefit from the enhanced visibility provided by REIL. Even at major airports, secondary runways might be equipped with REIL to supplement primary runway lighting systems, particularly when those systems are inoperative or during periods of reduced visibility.
While REIL offers numerous advantages, it also has some limitations. Its effectiveness is significantly reduced in very low visibility conditions, where even high-intensity lights struggle to penetrate dense fog or heavy snow. During electrical storms, REIL can malfunction due to power surges or lightning strikes. If the synchronization of the two lights is disrupted, it can create confusion for pilots, potentially leading to misidentification of the runway threshold. Therefore, it’s essential to remember that REIL is not a replacement for a full approach lighting system and should be used in conjunction with other visual aids.
For pilots, especially those beginning flight training or seeking safety best practices, understanding how to utilize REIL is vital. Always cross-reference REIL with other runway markings and distances information available on charts and approach plates. In the event of malfunctioning REIL, immediately report it to air traffic control to ensure the safety of other aircraft. Avoid relying solely on REIL for runway identification, especially in challenging weather conditions. Instead, use it as a supplementary visual aid to confirm the runway threshold identified through other means.
Here are some practical tips for using REIL:
- Cross-reference: Always cross-reference REIL with other visual aids and navigational information, including runway markings and distances available on charts.
- Report malfunctions: Immediately report any malfunctioning REIL to air traffic control.
- Don’t rely solely: Never depend solely on REIL for runway identification.
- Use in conjunction: Use REIL in combination with other visual aids for a more comprehensive understanding of the runway environment.
- Consider visibility: Be aware of REIL’s limitations in very low visibility conditions.
Understanding and effectively utilizing REIL is an essential part of safe and efficient flight operations. Its role in enhancing runway identification, especially in conditions of reduced visibility, makes it a valuable tool for pilots of all experience levels. By understanding its function, benefits, and limitations, pilots can integrate REIL into their pre-flight planning and in-flight procedures, ultimately contributing to safer and more confident approaches and landings. This knowledge is particularly pertinent for aspiring student pilots, novice private pilots, budget-conscious learners, and aviation enthusiasts interested in advanced cockpit technologies, all of whom can benefit from a thorough understanding of runway markings and distances and the vital role played by REIL.
Safe Landings
Understanding runway markings and distances is paramount for safe flight operations. From the threshold markings indicating the beginning of the landing zone to the runway distance remaining signs providing crucial updates during rollout, each element plays a vital role. We’ve covered six key aspects of runway markings and distances in this article: threshold markings, runway centerline markings, touchdown zone markings, displaced thresholds, runway distance remaining signs, and runway end identifier lights (REIL). Mastering these markings and understanding their significance empowers pilots to make informed decisions, especially during critical phases of flight.
Correctly interpreting these visual cues can help pilots can enhance their situational awareness and establish a consistent approach, leading to safer and more predictable landings. This knowledge is particularly valuable for aspiring student pilots beginning flight training, novice private pilots seeking safety best practices, and even experienced pilots looking for a refresher. Being proficient with runway markings and distances directly translates to improved safety margins during takeoff and landing – a crucial element for all pilots, especially those budget-conscious learners exploring cost-saving training tips by maximizing the effectiveness of each flight hour. Even for aviation enthusiasts interested in advanced cockpit technologies, a deep understanding of these fundamental principles strengthens their overall comprehension of flight procedures.
Taking the time to study and understand these seemingly simple runway markings and distances has a profound impact on overall flight safety and pilot proficiency. So, as you continue your journey in aviation, remember that these markings are not just lines on the pavement; they are your guides to safe and successful flights. Fly safe!
Recent Posts
FAA MOSAIC Final Rule: What Pilots, Manufacturers, and the Aviation Community Need to Know
Learn how the FAA’s MOSAIC final rule revolutionizes Light-Sport Aircraft certification, expands Sport Pilot privileges, and reshapes general aviation. See what’s changing, when it takes effect,...
Student Pilot Insurance: Essential Coverage for Aspiring Flyers
Discover how student pilot insurance can protect your flying dreams. Get expert tips and coverage options to ensure your safety and peace of mind.